After a long break I’m finally back to explain how to convert your used road bikes to single speed. There are many reasons you may want to do a conversion but that is a big enough subject to save for another post. Today I am focusing on how to do the conversion. And keeping with the used road bikes theme, I will be showing the fastest, easiest, and least expensive way (within reason) to do the conversion. There are many other things you could do to make the conversion more “perfect” and permanent; however, for most people the conversion I’m showing will suffice. Also, as I’ve said in earlier posts, I did this conversion to my bike right after getting it because one of the detailer cables was broken. Therefore, to the experienced mechanic, some pictures may seem slightly out of order if you know what to look for.
Also, I’ve decided to include the cost of doing these conversions and repairs I’ve been talking about, so from now on I’m going to include the cost of any parts necessary to do any work I talk about. For this conversion I spent ~$25 for a new freewheel and that’s it. If you need to buy the single speed conversion it is about the same cost. The only other expense my be to pay or tip your local bike shop for any assistance they provide. If you choose to replace the hub and/or front sprockets/cranks the cost could quickly jump into the hundreds.
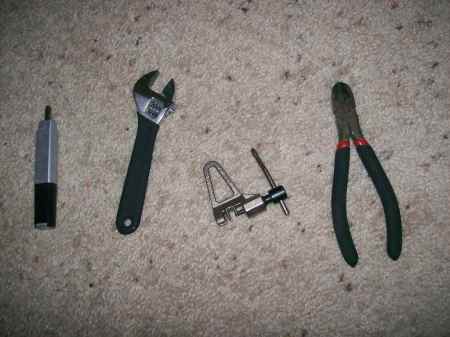
Tools Needed:
1. Phillips and flat head screw driver (to remove derailleurs and shifters)
2. Crescent wrench or socket (to remove the axle nuts)
3. Chain breaker
4. Wire cutter (speeds up the process)
5. Freewheel/Sprocket remover (don’t worry if you do not have one)
6. Depending on your bike you may need allen wrenches
Step 1
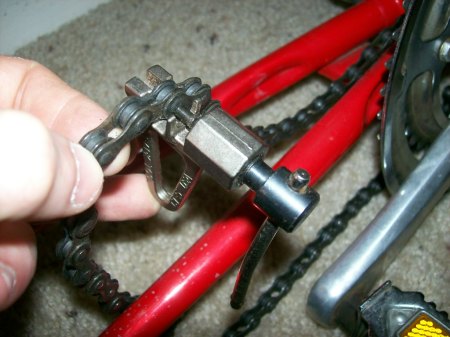
Break the chain with your chain breaker. This is somewhat tricky if you plan to reuse it and do not have a master link.
First, place the chain in the breaker and start pushing out the pin until it is almost out, but not entirely.
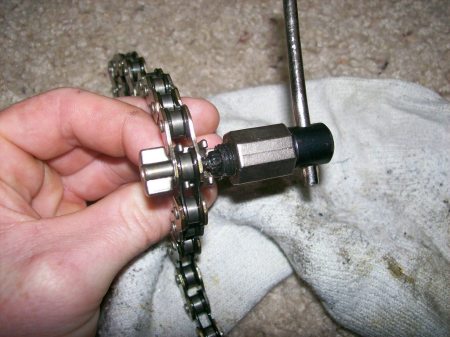
Then, pull the chain out of the breaker by loosening the pin pusher.

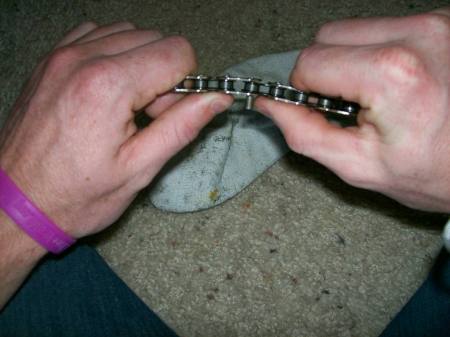
If you’ve pushed it out enough you will be able to bend the chain and it will pop apart. If not, place it back in the breaker and push out the pin a little bit more and try again. Continue until you get it to pop apart…it should look something like this
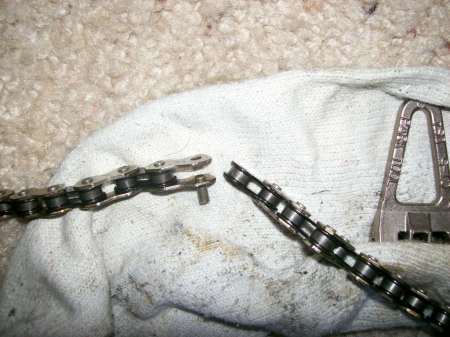
Pull it off the bike. If you plan to reuse it (which you can, as far as length is concerned), place it aside.
Step 2
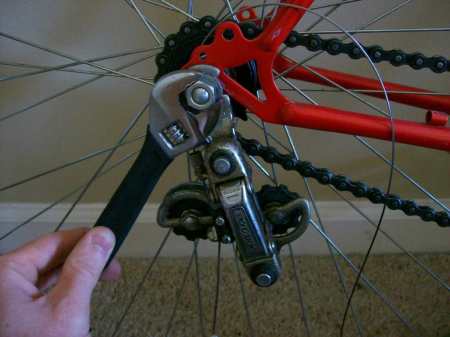
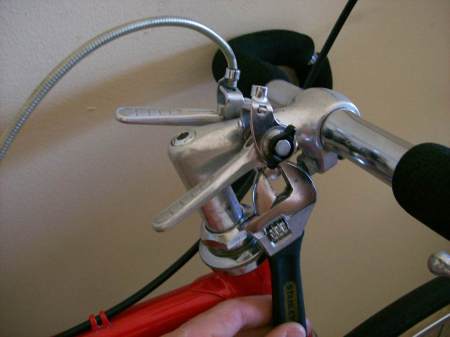
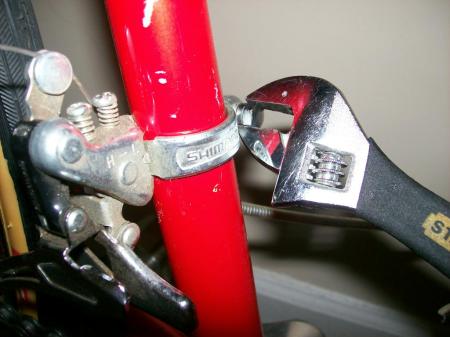
Next, is to go ahead and loosen and remove all the derailleur and shifter bolts. And remove the shifter(s) and derailleur(s). If you don’t plan on ever using the wires again I suggest just cutting the wires, it makes it much easier to pull them off the bike.
Step 3
Remove the rear wheel by loosing the axle nuts and pulling it out of the dropouts.
Step 4
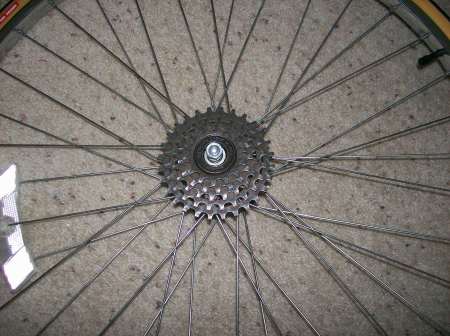
If you have the freewheel/sprocket removal tool you can go ahead and remove the rear cassette or freewheel. Depending on how old your bike is it may be a freewheel with multiple gears (which is what mine was, as the picture shows it just unscrewed from the hub) or it may be a cassette, which means there a many separate gears all locked onto the hubs cassette. Either way you need to get them off and if you are not very experienced with this I suggest taking it to a local bike shop and just tell them you want to remove the gears from the wheel. I did this and they removed it for free.
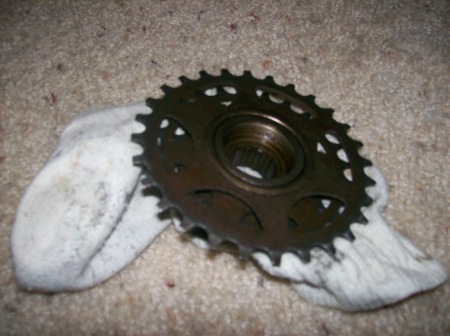
(alternative to Step 4)
The other thing you could do is simply skip to step 6 and not take out any chainrings, instead just choose one to use and make the chain fit that setting. This is possible and works, however, it leaves a lot of unnecessary weight and ‘junk’ on your bike. It is much cleaner and lighter to do this part correctly.
Step 5
If it is a freewheel, all you need to do is simply buy a new single speed freewheel and screw it on the hub. The only trick is finding out what gear ratio you want. Mine is 40/16 and as a relatively new single speed rider it is perfect. The best way to figure out what works best for you is to try some different gears before starting the conversion process. Lots of places across the web sell Freewheels and removal tools as well as local bike shops.
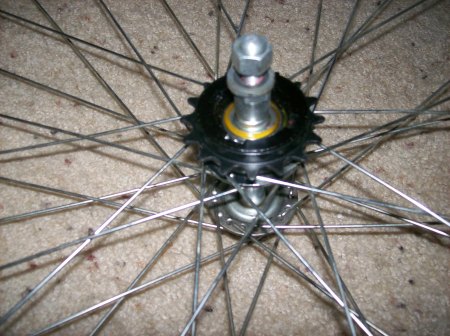
If it is a cassette, you can pick out one of the gear that you’d like to use as your single speed and save it. There are numberous single speed conversion kits available online that come with a gear or multiple gears. Here are a few for starters… single speed conversion kits. Just find one that will work with your type of hub (which is most) and the number of gears on your cassette and you will be set. These will come with directions on how to install and it is fairly straight forward.
Step 6
Put the rear wheel back on and finger tighten the axle nuts. Get the chain you are going to use and lay it over the gears and pull the ends together to figure out the length you are going to need. You will need to shorten the chain since it is not going to go through the derailleurs and multiple gears. Make sure you break the end that does not have the pin in it. If you removed your chain correctly (as I stated above) you will be able to break the chain completely this time (push the pin completely out) and just snap the other end into the new break and press the pin in. You’ll obviously need to take the chain back off the gears to get enough slack to put it together but make sure it stays on the bike, it must loop around the chainstay in order to go back onto the gears properly.
Step 7
Place the chain back on the gears and tighten the rear wheel making sure the chain is taught. Double check the chain alignment by looking at it from above and pedaling backwards. If it continues to jump off the gears you will need to change the spacing either on the front or back gear so that they are aligned better.
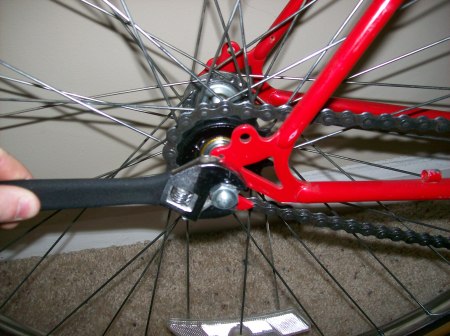
Finished Product…
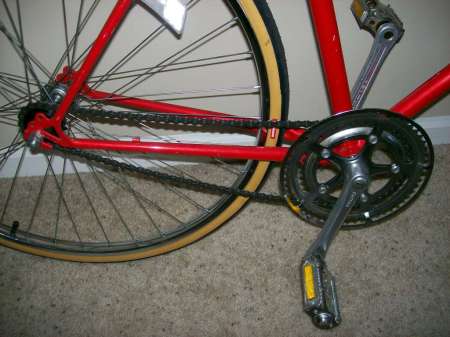
Step 8
Enjoy! Go for a test ride and make sure everything is functioning and if you replaced the freewheel you may feel it tighten as you pedal the first few times.
Other Notes:
Again, depending on your bike there may be a few differences. Also, there are a number of other things that are beyond the realm of this post that could be done such as replacing the rear hub or the front chainrings. If your front chainrings are just bolted together you can unbolt the ones you are not using and leave the one you are using to further reduce weight and clean it up. If there are any questions do not hesitate to ask in the comments, I’m sure many others will benefit from them as well.
Hey Ben, would this happen to be the Panasonic Sport 500 that you did the conversion on? Wondering because I’ve got the same bike (silver one I inherited from my pops) and wanted to know what particular freewheel you bought for it. Thanks!
Yes Steve it is!
I actually used a BMX style freewheel from Dans Competition (www.danscomp.com). I also ride BMX bikes, so when I was placing an order for some parts I had them throw in a freewheel. More specifically it was a Dicta 16 tooth. It’s basically the cheapest freewheel you can get. Some are flip-flop only (meaning the threaded part is smaller) and that is not going to fit (assuming your bike is just like mine), you just want a regular one. The main thing is to make sure you get the gear you want and that the width will fit your chain…if you’re in doubt get the thinest one (3/32″). I’ve used ACS Claws freewheels a lot and they are very good, I’d actually recommend that over what I got. Good Luck!
Brilliant! I love it. I wish I had a bike to convert. Too bad my bike now only had one gear to begin with : )
I am considering changing from a free hub to a fixed hub… how about a post on the pros and cons?
cheers mate that has helped me loads how long did it take you and was it hard.
does it work with everybike.
It took about 30 minutes once I had all the parts and had the rear freewheel removed. If you have a basic knowledge of bikes, this will be very easy. If you have no knowledge of bikes it will be a little more difficult, but with my instructions and a little help from a local bike shop it is something anyone could do. It will work with every bike, but the process may very somewhat depending on the age and type.
[…] aid me in this quest I found this handy blog post on converting old road bikes to fixies. Technology — Tags: Bike Dickheads, Fixed Gear, How To — Viking Brian @ 11:16 […]
Hi, the pictures appear to have disappeared, would you please be able to resolve ? This looks like a very good article and the pictures would help a lot. Thanks.
Yeah, I apologize, I’ve been trying to get this fixed. It will be back to normal by 2/11/09. Sorry for the inconvenience.
did you use spacers on your hub? or do you not need it for bmx freewheel hub conversions? thanks!
No I didn’t need to, the bmx freewheel just threaded on and screwed all the way to the hub. If you do it this way and still need to align the chain better try switching around or adding spacers on the axle to move the whole wheel. Then depending how far you move it you may need to get the wheel re-trued (or dished) differently. If you have a cassette and a conversion kit you should be able to use the included spacers to align the chain with no other changes. Feel free to reply if you still need more input…Good Luck!
hey man, this really helped me! thanks. if i was to replace an old slightly bent axle and then do this conversion, would i need to redish the wheel no matter what?
Your very welcome! You shouldn’t need to re-dish the wheel if you replace the axle. The only reason you should have to re-dish the wheel is if you are actually moving the hub/cassette/rear sprocket in order to get a straighter chain line, which you only need to do if you are having problems with the chain staying on the gears after the conversion. Sounds like you can just replace the axle, do the conversion and ride.
Nice job. Great pictures. I’ve done a few SS conversions and would add a couple things to think about (acknowledging that there are lots of ways to do this).
If you plan to reuse your double chain rings and freewheel cone, you have a couple of options when it comes to your gear ratio. You can run the chain down the inner chain ring and the aligning freewheel gear, or run it down the outer ring and the aligning freewheel gear. The inner tends to be better for hilly areas, the outer for the flats. Ghetto, sure, but cheap.
Also, at Step 6, I like to reinstall the rear wheel a little bit forward in the dropout (so there’s still room to move it back). That way, once you’ve cut your chain, you’re guaranteed to have room to slide it back and snug up the chain.
Great work again.
p.s. Shimano make pretty nice single freewheels also.
I have a 1980’s Schwinn World. I bought an 18t freewheel and installed a Motobecane 52t chainring/crankset from another bike I had. I can seem to get a straight chainline. Will I need to have the rear tire re-dished? When they redish it, will they be able to get the hub over a few inches, because the chainline is at least 2 inches off.
Let me know. I have put too much money into this bike for it not to work! lol
Well the first thing is to get the chain-line as straight as possible either by spacing the hub to one side or spacing the cranks to one side (or some combination of the two). On older bikes there are usually nuts, spacers, or washers that hold the hub to one side which allow for the multiple gears to go on one side. You should be able to move most if not all of these spacers to the other side of the hub and get the chain-line really close. Once you do that, then you can get the wheel re-dished so that the tire sets in the center of the bike.
Hey, how do you tell whether it’s a cassette or just a free wheel with multiple gears?
Cassettes have a lock ring that has a bunch of prongs on the inner part of it. http://www.freemanscycles.co.uk/images/cassettes/shim_cass_HG50.jpg is a cassette, notice the dark ring in the middle. It has lots of slots in it…that is for a cassette removal tool to fit into and allow you to remove it. A freewheel is typically 2 large prongs or two small holes. http://homepage3.nifty.com/ClassicBicycles/brands/components/CycloOldCompe.JPG this is a freewheel…notice the two slots on either side of the middle ring. If you’re still lost, take it to a local bike shop and they can tell you.
i have a schwinn le tour. 10 speed. After taking off the freewheel. Do i need to change the rear wheel hub? or will that work also?
Depends…If the chain-line is good and the wheel is centered then yes you can use it as it is. Otherwise, you will likely need to adjust the hub toward the drive side of the bike. And if that moves the wheel too far to one side that the tire hits the chain or seat stay then you will need to re-dish the wheel.
In spite of the myriad of info and tutorials to be found on the web, how can one be sure to select a conversion kit that is compatible with the frame they are working off of? More to the point, is a cheap department store bike going to give me the same bones to work with as a higher end bike? I realize already that the front 3 chainrings will have to stay, as they are riveted together. But as far as replacing the rear cog and applying a chain tensioner, are the mounts and threadings pretty much universal among most makes and models?
Selecting and buying components on the web, which is my only viable option is like working blind,
Thanks in advance!
Well you can never be sure with anything you buy online. However, bicycle components are typically very universal… to a certain extent. Bikes usually have one of a few different specs for major components. For example, there are basically two sizes of steer tubes 1″, which is typically threaded, and 1 1/8″, which is typically not threaded. The trick is determining which you have. Now there are certain ‘special’ bikes out there that have 1 1/4″ or even 1 1/2″ steer tubes. However, since these are so rare and are usually some brand related feature I’m not going to focus on it because chances are if you have a bike with ‘special’ specs like this you likely have a strong knowledge of bikes and reasons for choosing that type of bike. Sooo…for the most part bikes are universal with 2-3 different types. Even high and low quality bikes have similar specs it’s just that higher quality bikes are typically better materials and higher quality engineered parts. As for the rear wheel and hub…you likely have one of the two. However, it is ‘possible’ that you have something different, just very unlikely. All you can do is gather all the info you can and ask around the most you can then choose what you have found to fit your needs. I’ve tried to simplify it as much as possible by focusing on the main types and giving you good sources for the products. It is possible that even with all this you could still get the wrong thing. All you can do is order it and if it doesn’t work, return it and try the other. Hopefully with the info you’ve gathered you can be right the first time!
Hey dude, this is exactly what i was looking for, as most other guides for converting your old bike assume that you have a cassette-based bike. Anyway, the problem i am affraid of running into concerns the spacing. I am about to buy a new rear wheel (freewheel) to be able to install the single speed freewheel, but i am concerned about the chain allignment. Can you adjust the rear cog’s position with the use of spacers or is it ‘locked’ in one place? I am affraid that when i get all the stuff i won’t be able to get a straight chainline. I appreciate your help.
The bike I used in the conversion you see online had a freewheel. Luckily, I was able to just screw it on and the chain was straight enough to stay on and work. However, you cannot use spacers with a freewheel, only a cassette can be spaced. If it is not inline you can typically space the rear hub within the drop outs (the part of the frame that holds the wheel). When you do this it will move the entire wheel. After moving the whole wheel and you get the chain-line straight you will need to check the wheel (near the rim and tire) to make sure it’s not too far off center. If it really far off center it will actually be touching the frame on one side. If it is you will need to re-dish your wheel. Re-dishing just means to move the rim on the hub by adjusting the spokes. A bike shop can do this for about $20 if you are not experienced with lacing and adjusting spoked wheels.
What bike is that?
Panasonic Sport 500!
It’s difficult to find educated people on this topic, however, you seem like you know what you’re talking about!
Thanks
It’s an amazing poszt designed for all the web people; they will
obtain benefit from it I am sure.
My brother suggested I might like this website. He was once entirely right.
This publish truly made my day. You can not believe simply how a lot time I
had spent for this information! Thanks!